Android AppSupport
Information on the Android AppSupport in Sailfish OS.
General information can be found in the official documentation at https://docs.sailfishos.org/Support/Help_Articles/Android_App_Support/
- Android Layers in Sailfish OS
- Android app start triggers
- microG installation (Google Play simulation)
- Migrating Android app data
- Transfer Signal using Signal-native Backup and Restore
- Transfer WhatsApp by copying the internal app files
- Transfer Threema/ThreemaLibre data with native backups
- The Lock Pin
- Bluetooth support in Android Apps
- Government apps/services in AAS
Android Layers in Sailfish OS
This page is mostly based on DrYak's explanations in the forum.
Sailfish OS can be seen in multiple layers of software:
- at the bottom, the manufacturer of the chipset (e.g. Qualcomm) usually only produces drivers that are designed to run in Android (including some of the unusual libraries and interfaces that Android runs unlike other Linux-based OS)
- on top of the hardware, SailfishOS is a relatively standard GNU/Linux distribution (audio handled with PulseAudio, graphics with Waydroid, etc. has a standard C library)
- Jolla uses a special compatibility layer (libhybris) that makes the Android-only driver usable in the classic Linux distro such as SailfishOS.
- on top of the OS, you can run native Linux apps, mostly written using Qt and QML graphics.
To run native applications, no Android is required.
To run Android apps
- Jolla provides a compatibility layer called Android App Support. It's an LXC container (mostly like Docker containers) that you can optionally download and install from Jolla's application store.
- Once the container is started (either by autostart or manually), AOSP runs inside it (only Open-Source Android, not the proprietary parts including Google Play).
- this makes some Android apps possible to run. You'll most probably rely on F-Droid to download (open source) Android apps.
- optionally you can install microG, it's an opensouce re-implementation of “Google Play Service†the API that are normally provided by the proprietary Google Bit.
- this makes a lot more apps possible to run. You can use the open-source Aurora (installable from F-Droid) to download and install apps from Google's own Store.
- some apps might still refuse to run due to some specific things that the original proprietary Google Play Service provides but which are missing in microG (e.g., some Banking apps might complain about a rooted device because they want a full Google SafetyNet remote attestation).
- optionally, you can also install it instead of the original Google Play Service.
- this kind of defies your de-googling attempts.
- but this makes the stubborn e-banking app workable
- also, you don't need to constantly run the container. You can keep the container not running, and only run the container for when you need that one Android app you can't find a replacement for
A big difference between a stock Android OS, and Android App Support is that you get more options to control what is running in the phone (even more if you opt to use microG instead of Google's own shit).
e.g.:
- you can manually start Android App Support yourself (and only run native SailfishOS apps the rest of the time).
- you can configure Android App Support to not start applications in the background on startup.
- you can configure microG to not automatically start an application when that gets a message/alert from the cloud servers.
Also:
- the AOSP running inside the container cannot see and use the hardware of the phone. For technical reasons, it needs special supports that expose stuff to Android.
- e.g., you can plug in a USB keyboard or pair a Bluetooth keyboard, and Android will see an available “input deviceâ€.
- e.g.: you can pair Bluetooth speakers, and Android will see an available “audio outâ€
- However, there is currently no support for Bluetooth itself, so you cannot use Android apps that need to directly talk to a Bluetooth device (you cannot use the speaker manufacturer's app to flash a firmware update to the Bluetooth speaker).
On smartphones not officially supported by Jolla, there is the open-source Waydroid solution, which is pretty similar to Android App Support.
- The main differences are in what adapters each has (e.g.: Waydroid currently cannot open multiple windows on SailfishOS)
So TL;DR: You get a whole range of options between:
- only the hardware drivers are written by Qualcomm
- more or less support for apps with some containers and optional service replacement (and you can prevent apps from running in the background).
- full(-er -ish) compatibility by replicating a full Android, but at least you get to shut it down when not in use.
Android app start triggers
This page is mostly based on DrYak's explanations on the forum.
Autostart when Android AppSupport starts
This is controlled with the Sailfish settings app.
Click Settings app → switch to Apps tab → select the app → use the " Allow application background service to start on bootup " checkbox (Needs to be off to prevent autostart).
This will prevent the app from autostarting whenever Android App Support is started.
Notifications
Apps can automatically start to show an alert pop-up (if you set some alarm clock thingy inside your app, e.g., a game reminding you that your crops are now ready to harvest or whatever). You need to access the Android settings to change that (either you can use the “Open Android Settings†button in the App’s settings, or there’s a patch called “Launcher icon for android settings†in the Patchmanager Webcatalog)
Either:
click Settings app → switch to Apps tab → select the app → click the “Open Android Settings†button
then from the App’s Android settings → click Notifications
in the notifications setting, tweak to your wishes.
Or:
click Android Settings app → select App & notifications → select Notifications → scroll to the section titled Recently sent
tweak to your wishes
This will prevent applications from autostarting a showing toaster alerts about in-game events, google maps showing alerts about traffic in your area, etc.
Google Cloud Messaging (push notifications)
Whenever an app receives a push notification from the network, the app can start to fetch that network message and act on it. (e.g.: somebody writes you a chat message, so Google’s cloud pings your phone to tell you that there’s a chat message waiting for you, WhatsApp auto-starts, receives the chat message, and displays it) (or: your bank wants you to click on their 2FA app to confirm a transaction, so Cloud pings your phone, the 2FA app starts, and you get the “Please confirm†pop-up). The purpose is to avoid every single app on your phone wasting battery by constantly probing their server for updates, instead everything is centralized through the push notification system.
This can only be controlled if you use microG, as far as I know the proprietary Google Play Service don’t let you configure that.
click microG settings app → select Cloud Messaging → select the app.
You can tweak 2 settings:
- Start app on push message: You can then select if the app is allowed to autostart to process alerts from the internet when they arrive, or if the alerts will wait until you manually start the app.
- Allow registration: If the app is even allowed to receive alerts from the internet.
If this function isn’t turned on (you didn’t even install microG), chat apps might not immediately get chat messages but only periodically when they directly contact their server, sometimes only when you bring the app into focus.(Usually I allow WhatsApp and the banking app, and kill everything else).
Share suggestions
Whenever you hit a Share button in an Android app, in addition to showing you a list of apps that can share that media type (e.g.: all chat apps can share JPEG photos) like when you click Share on SailfishOS, on Android some apps can auto start and generate a list of suggested share (e.g.: WhatsApp will suggest your top most frequently used contacts).
AliExpress’ shop absolutely loves this function and constantly autostarts whenever you hit an Android share button.
There's no known way to disable this except either using the SailfishOS share option (it doesn’t trigger autostart) or manually killing the autostarted application (e.g., in Crest).
microG installation (Google Play simulation)
Please refer to Installing microG on Sailfish OS in the forum for any updates.
Version Jan 31st 2025
This wiki is intended as a place to find out up-to-date information on how to install microG on Sailfish OS (sfos) with Android AppSupport. Initially I’ve just copied over the information @DrYak’s excellent summary on TJC, but because this is an editable wiki, we all can keep it up-to-date.
Use these instructions at your own risk, and update the information if you find something has changed.
What is microG good for?
microG is an Open Source Software replacement for the proprietary Google Play Services, which some Android apps require to install or run properly, e.g. some online banking apps. For details read the excellent Wikipedia article about microG or microG’s own description. Having microG installed and configured should allow e.g. many banking apps work with AppSupport.
Donations
As a side note, if you would like to support the development of microG, you can do so via LibrePay or GitHub Sponsors.
Pre-requisites
Before starting, this is what you need:
- a supported device running Sailfish OS
- a paid license for the device
- Jolla Account set up in the device
- Android™ AppSupport 11 or 13 installed (depending on the device)
Note that developer mode is not needed for the typical install case.
If you have modified AppSupport, you may have to remove and re-install it. Note that this removes all Android application data from the device! For more details on the topic, see Removing Android AppSupport.
Allow running microG
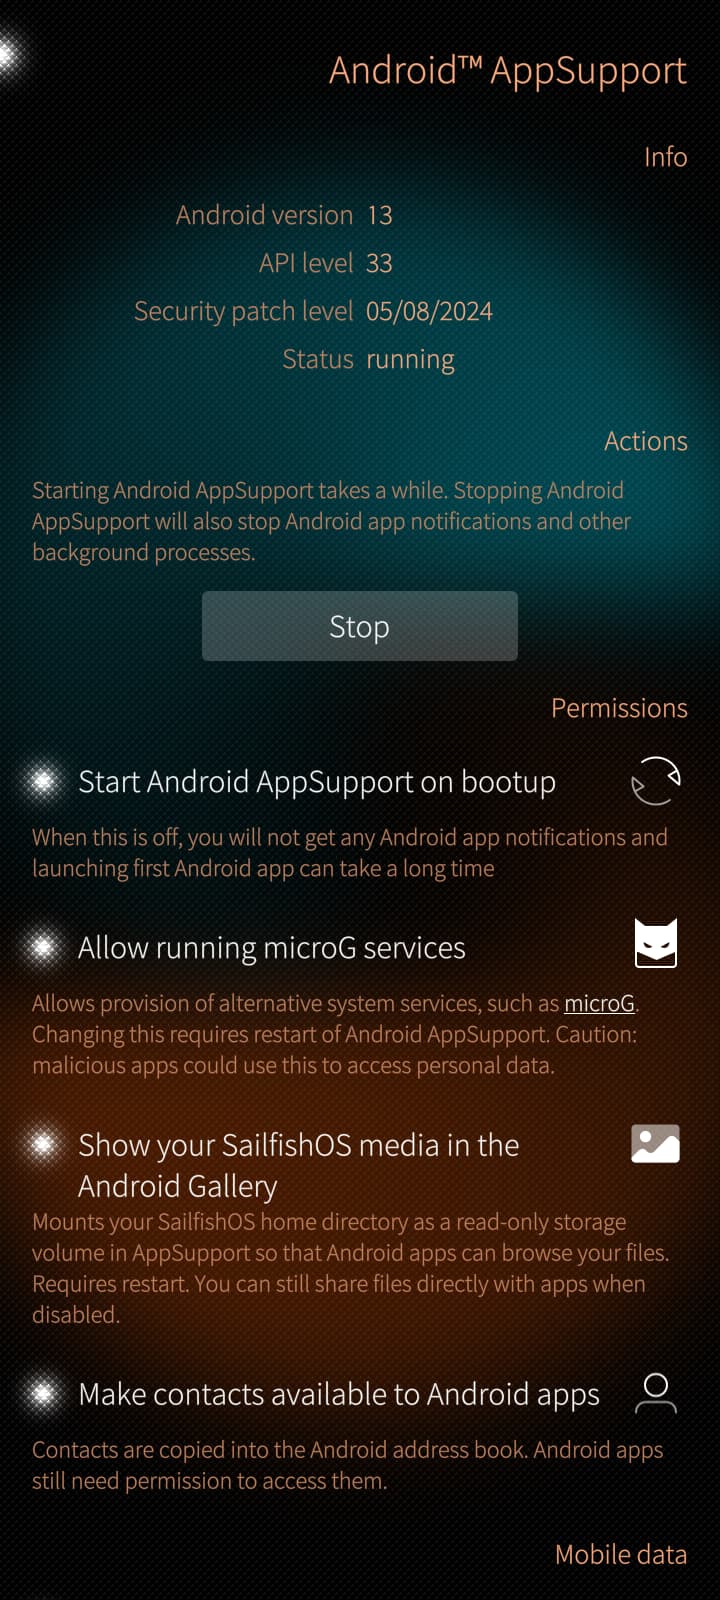
The first step is enabling microG usage in AppSupport. Go to Settings - Android™ AppSupport and enable Allow running microG services. Then restart AppSupport by clicking the Stop and Start on the page.
Install F-Droid
Now that AppSupport has been prepared, install F-Droid from Jolla Store. Also make sure to update F-Droid by checking for updates in F-Droid itself. This makes sure that F-Droid has the necessary permissions to install applications as well, so allow the permission in the Android settings view when presented.
Add microG repository to F-Droid
In order to have the microG packages available, we first have to add microG software repository to F-Droid. There are two ways to do this:
- Reading the QR code from another device
- Entering the repository manually
To read the QR code, first go to microG download page on your computer. On your phone, open F-Droid and go to Settings - Repositories and click the green plus sign. Then tap the SCAN QR CODE button, point the phone camera to the QR code on the screen and add the repository.
Or, if you can’t read the QR code from the screen of another device for some reason, you can enter the repository URL manually. Open F-Droid and go to Settings - Repositories and click the green plus sign. Then tap Enter repository URL manually and write the microG repository microG F-Droid repo the field and add the repository.
Installing microG packages
Now we’re finally ready to install microG packages! In F-Droid, go to Settings - Repositories and tap microG F-Droid repo to open it.
(If you want to verify the repository fingerprint, now is a good time to do it. You can find it in the bottom of the page. It should be identical to the one displayed in the microG download page.)
Tap SHOW APPS to see the three microG applications available:
- microG Services
- microG Companion
- microG Services Framework Proxy
Install the applications in the order above.
Granting permissions for microG
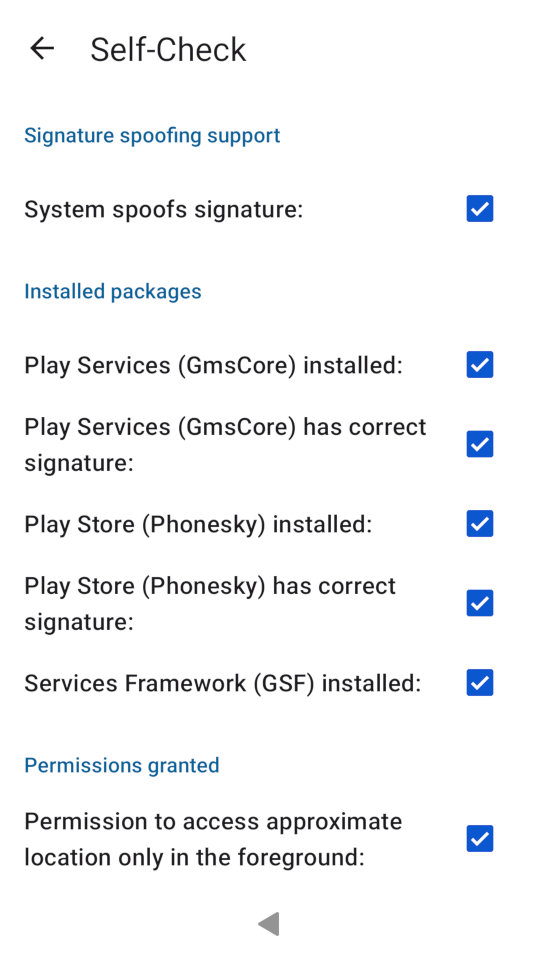
The last step is granting microG all the permissions it needs to function properly. Open the microG Settings application from the application launcher and tap Self-Check.
First, make sure that the first six checkboxes are all checked. Some of them are already checked, so you should only have to tap the System spoofs signature and Play Store (Phonesky) has correct signature" checkboxes and allow the permissions in their respective dialogs. Hint: tap the text, not the checkbox.
Finally, we need to give microG a selection of more typical permissions. Tap the permission texts/boxes one by one and allow the permissions. For some checkboxes, you may be presented with additional dialogs or an Android settings page. This is expected, so allow or add the permission in those dialogs and pages as well.
There’s one exception: notifications permission needs to be added manually. See Adjusting the settings of Android AppSupport of Sailfish OS for instructions.
The checkboxes should now all be checked like this:
Restart AppSupport
To make sure the permissions are in effect, restart AppSupport in Settings - Android™ AppSupport by clicking Stop and then Start. Then open microG Settings and tap Self-Check to make sure the checkboxes are still checked.
Additional applications
Now that microG is installed and configured, it’s feasible to install additional applications. Here are some examples.
- Aurora Store is a Google Play Store client available in Jolla Store and in F-Droid.
- Chromium-based web browser is required for some third-party applications to work properly, sadly won’t satisfy all applications. For example, MobilePay requires one for successful login. For this purpose you can install Vivaldi from Aurora Store (or directly from Vivaldi download page). There are other suitable browsers as well, Vivaldi is used as a tested and an available example here.
- For developers, Stanley (from F-Droid) lets you inspect installed applications, granted permissions and much more.
Advanced topics
Note: The following topics either need further testing, are outdated or possibly not even applicable any more. These are collapsed for brevity.
Configuring location services
microG allows customising the location settings and services it uses. Open “microG Settings” application and hit “Location”.
Here you can enable different location services. Selecting “Request from online service” from “Wi-Fi location” section, you can change the backend settings by hitting the triple-dot icon in the top right corner.
Note : Keep in mind that, as of 3.1.0 Seitseminen, Android app can see and query the WLAN (WiFi connection), but currently as demonstrated by several questions filed by other community members, the 3G/4G connection isn’t always seen by Android Apps.
Thus you need to only rely on WiFi Network-based connection e.g.: rely on Apple’s back-end. If you do not do that you’ll get the following problems:
- “UnifiedNLP has no last known location. This will cause some apps to fail.” (if no other back-end present)
- “UnifiedNLP do not have Location to test Geocoder - Please verify your location backend” (if no other back-end present)
- “No UnifiedNlp location was provided by the system within 10 seconds”. (always fails)
That because the back-ends that rely on 3G/4G cell hang.
Google Cloud Messaging
I’ve written another HOWTO about auto-starting apps. You might check how to enable/disable apps getting automatic alerts from the Cloud, and optionally getting auto-started to process it (e.g.: WhatsApp automatically getting messages instead of you needing to fetch them).
Apps that rely on Google Cloud Messaging and were already on the phone before you setup microG need to be installed again.
Google Play Store
Note: Using microG and Aurora Store is recommended instead!
This how-to is done for using an Open Source Software client app for browsing, fetching and installing APKs from the Google Play Store (such as aforementioned Aurora Store app) and the empty FakeStore package to trick any application that checks the presence of " com.android.vending ".
For people wanting to use the genuine Google Play Store client app (only needed in order to buy Android apps directly from within the Google Play Store client app), this is possible thanks to NanoDroid and carmeloferso’s guide:
- add nanodroid repository to F-Droid
- install Google Play Store from nanodroid
- grant it signature spoofing using the " enable system package replacement " permission
- in the Android Settings , in section " Users & accounts - Current user: Owner "
- add Google account (if not already set-up in microG).
- " Sign-in & security "
- Turn on " Trust Google for app permissions - When disabled, the user is asked before an app authorization {…} "
- Turn on " Allow apps to find accounts - When enabled, all applications on this devices will be able to see your Google Accounts "
- Start Google Play Store and let it sync.
Migrating Android app data
Transfer Signal using Signal-native Backup and Restore
The best source to install Signal is always direct from the website https://signal.org/android/apk/#target
Export on the old phone
Open the Signal app and go to the settings. Navigate to Chats and then Backups (at the bottom). If they are disabled, turn them on.


Note down the passphrase, you'll need it for the restoration!
Data transfer
Import on the new phone
Starting Signal the first time, it asks you if you want to set it up newly or restore from a backup.
On the next screen you will be asked if to restore from another device or from a file. Chose the latter:

On the next screen click the button "Choose backup":
This opens the native Android file chooser. With the button top left you can switch between internal storage and memory card.

Choose your backup file.
The next screen will show you a few meta information on the file (age, size):

Tapping on "Restore backup" will ask you for the passphrase:

Now, the restoration is in progress:

Guide to be continued.....
Transfer WhatsApp by copying the internal app files
As of 2025, the default method of WhatsApp to Backup and Restore requires a Google Account and Chat data transfer using local Wifi requires Android features that are not available on Sailfish OS.
You will need to have the developer access enabled (access via SSH) and system administration experience is of good value.
We start on the old phone:
- Turn off Android: As a first step, open the Settings App, go to System, and select Android™ AppSupport. Tap the Stop button and wait until he action is completed.
- Open Terminal or Login using SSH
- Enter
devel-su - Run
tar -czf /home/nemo/whatsapp.tgz /home/.android/data/data/com.whatsapp/ - Transfer the resulting file to the new phone
Then, continue on the new phone:
- Start WhatsApp once and stop it again
- Open the Settings App, go to Apps, select WhatsApp and delete the data and clear the cache.
- The, still in the settings switch to System, and select Android™ AppSupport. Tap the Stop button and wait until he action is completed.
- Open the terminal and enter
devel-su - Run
ls -ld /home/.android/data/data/com.whatsapp/and remember the owner and group ids. They both are the same and likely look like 100XX. - Delete the existing directory
rm -r /home/.android/data/data/com.whatsapp/ - Run
cd / && tar -xzf /home/nemo/whatsapp.tgz - Reset the permissions as read before:
chown -R 100XX:100XX /home/.android/data/data/com.whatsapp/
Now start WhatsApp and enjoy!
Transfer Threema/ThreemaLibre data with native backups
Either Cloud backup or local backup
The cloud Backup does not include the chat contents!
Just transfer the archive from one phone to the other.
The Lock Pin
Many applications depend on the Android Os layer lock facilities (pin/fingerprint, etc) instead of implementing their own. This Chapter details ways to deal with AAS lock pin dificulties.
Jolla C2 / Xperia AppSupport PIN Workaround
As detailed by nekron https://forum.sailfishos.org/u/nekron on the forum:
This is what needs to be done for Jolla C2 / Xperia devices with the latest appsupport runtime:
Notes:
Technically speaking the Android security settings application will talk to gatekeeperd service that will connect with the gatekeeper HAL service. The HAL service will use hardware keystore (TEE) or in case of appsupport a software-based keystore for storing your PIN credential.
The problem in current appsupport is the launch of GK HAL service that’s missing inside the image. There is sadly no init.rc service found to launch the service.
#
# Jolla C2 / Xperia AppSupport PIN Workaround
#

# 1. enable developer mode, open terminal or ssh into your device. Appsupport container must be running.
# 2. become r00t
devel-su
# 3. launch appsupport shell
appsupport-attach /system/bin/sh
# 4. launch gatekeeper HAL process (GK HAL)
/bin/hw/android.hardware.gatekeeper@1.0-service.software &
# 5. kill gatekeeperd (it will be restarted automatically and connection to GK HAL established, oh well, that's about it for process isolation with SE extension running this as root vs. system)
pkill gatekeeperd
# 6. launch Android security settings
am start -a android.settings.SECURITY_SETTINGS
# 7. now set a PIN using the security settings UI and your're done!
# NOTE: I tested this with ATOSS Staff Center and after a reboot of C2 without connecting the GK HAL I was able use the application.
# 8. older appsupport runtime for Xperia devices allows you to set the PIN
# via shell command "locksettings set-pin 1234". You can remove the lock PIN
# with "locksettings clear --old 1234".
Bluetooth support in Android Apps
There are some serious limitations in access to bluetooth in the AAS. Here we document some known solutions. The original source for much of this information is: the forum
Petefoth SailfishOS: Bluetooth in Android AppSupport
Pete documents his solutions to allowing android apps (the lxc container) bluetooth access in his repo:
https://codeberg.org/petefoths-projects/SfOS-Bluetooth-in-AAS/
or
https://codeberg.org/poetaster/SfOS-Bluetooth-in-AAS
Implementation of a method in SailfishOS (SfOS) to allow user to switch Bluetooth (BT) support between SfOS and Android AppSupport (AAS).
Current status
As stated in this forum post
I have something similar working using
qCommandapp: switching BT to AAS is working fine; switching it back to SfOS is still ‘work-in-progress’ - sometimes it works, sometimes not.
Current status of my qCommand stuff. (For both commands I've commented out the if systemctl is-active condition, because it's not working as expected)
qc_BT-to-Android : mostly works. I can connect to and sync my watch in the Garmin Connect Android app, and connect to and control my hearing aids in the BeMore Android app.
Code
if [[ ! $(whoami) = "root" ]]; then
echo "must be run as root" >&2
exit 1
fi

# start by setting up the config file,even if it exists already
echo "[Config]" > /opt/appsupport/etc/appsupport.conf.d/99-passthrough.conf
echo "Proxies=android.hardware.bluetooth@1.1::IBluetoothHci,android.hardware.bluetooth@1.0::IBluetoothHci/default" >> /opt/appsupport/etc/appsupport.conf.d/99-passthrough.conf

# Stop the BT services in SfOS
systemctl stop bluetooth
systemctl stop bluebinder

# Start AAS if it isn't running already:
# returns 3 if inactive
# 0 if active
if [[ ! $(systemctl is-active --quiet appsupport@defaultuser.service) = 0 ]]; then
  echo "starting appsupport"
  systemctl reload-or-restart appsupport@defaultuser
fi

# Start the Android BT process
appsupport-attach pm enable com.android.bluetooth
qc-BT-to-SfOS: mostly works. Occasionally gives an error when starting bluebinder times out. (I haven't checked the status of BT in SfOS if the error occurs. Nor have I looked into detail in "journalctl -xe". That, and sorting out the operations conditional on systemctl is-active are the next jobs :slight_smile:
Code
if [[ ! $(whoami) = "root" ]]; then
  echo "must be run as root" >&2
  exit 1
fi

# If AAS is running, stop / disable its BT  process
#if [[ $(systemctl is-active --quiet appsupport@defaultuser.service) = 0 ]]; then
echo "DisablingBT in Android"
  appsupport-attach pm disable com.android.bluetooth
echo "Stopping AAS"
  systemctl stop appsupport@defaultuser
#fi

# Start the BT services in SfOS
echo "Starting bluebinder"
systemctl start bluebinder
echo "Starting AAS"
systemctl start appsupport@defaultuser
echo "Restarting bluetooth"
systemctl  restart bluetooth
Occasional error
Job for bluebinder.service failed because a timeout was exceeded.
See "systemctl status bluebinder.service" and "journalctl -xe" for details.`
Background
The means to allow BT access for Android apps running under AAS is described in this post in the SfOS communtiy forum. As described in that post and replies, BT can be available EITHER to SfOS OR to AAS, but not to both. The aim of this project is to proved a means for users to switch BT availability between SfOS and AAS.
Use cases
My use cases:
- Garmin Smartwatch: download golf course data from Garmin Connect Android app running on the phone. As far as I know, this is the only way to achieve this: it is not possible to download Golf Course data from PC to watch. (Note this is a multi-sport watch and golf courses are not pre-loaded: they must be loaded from the phone. For dedicated Golf watches, with courses preloaded, course updates can be downloaded from PC or Web)
- BeMore Hearing Aid control app. Proprietary Android app that allows fine-grained control of hearing aids - volume, noise filters, favourite settings
These operations are both short in duration: the workflow would be
- Enable BT in AAS
- Perform the operation
- Disable BT in AAS and re-enable it in SfOS
The proposed solution would also meet the needs of users who wish to have BT access available to AAS
- all the time: never available to SfOS
- for as long as AAS is running
Implementation
I think this solution can be implemented by
- Creating two shell scripts:
bt-to-aas.shenables BT in AASbt-to-sfos.shenables BT in SfOS
- Implementing a mechanism to call thses scritps from the SfOS UI
Enable BT in AAS (bt-to-aas.sh)
- stop AAS if it is running - (is this doable from a script?). Or leave it running while we do steps 2 & 3, and restart ASS in step 4
- stop bluetooth and bluebinder services
- add (or uncomment) this line (using
sed?) to/opt/appsupport/etc/appsupport.conf.d/10-hybris.confProxies=android.hardware.bluetooth@1.1::IBluetoothHci,android.hardware.bluetooth@1.0::IBluetoothHci/default - start (or restart) AAS - (is this doable from a script, rather than from SFOS settings menu)
Enable BT in SfOS (bt-to-sfos.sh) I am less sure about what is needed here. A 'quick and dirty solution might be to edit the 10-hybris.conf file then reboot the phone. I would prefer a slightly more elegant and less destructive solution :slight_smile:
- do I need to stop bluetooth and bluebinder services again, or are they still not still not running since being stopped in the
bt-to-aas.shscript? - stop AAS
- is this necessary or can we just restart it once we have changed the
10-hybris.conffile? - is this: do-able from a script ?
- is this necessary or can we just restart it once we have changed the
- OR disable AAS Android Bluetooth package, but leave AAS running
- remove (or comment) this line( using
sed?) to/opt/appsupport/etc/appsupport.conf.d/10-hybris.confProxies=android.hardware.bluetooth@1.1::IBluetoothHci,android.hardware.bluetooth@1.0::IBluetoothHci/default - restart bluetooth bluebinder and services
- restart AAS (optional: we could leave this to be done manually)
Problems to solve
- How to stop
- AAS if running: normally do this from from SFOS settings menu. Can we do it via a script?
- Stop bluetooth and bluebinder services: Solved in forum post
systemctl stop bluetooth
systemctl stop bluebinder
- How to change the contents of
10-hybris.conf?- answer probably involves
sed. I need to experiment to find out how to- add the needed line in
10-hybris.conf - remove the added line in
10-hybris.conf
- add the needed line in
- answer probably involves
- Better approach: don't touch
10-hybris.conf, use a different file.- Delete it to enable BT in SfOS
- Create it to enable BT in AAS
`echo "Proxies=android.hardware.bluetooth@1.1::IBluetoothHci,android.hardware.bluetooth@1.0::IBluetoothHci/default" > /opt/appsupport/etc/appsupport.conf.d/99-passthrough.conf
-
Where in the device filesystem will the scripts live? And how will they get there?
-
How to invoke the scripts so that they have root /
devel-suaccess to perform privileged operations (e.g. starting / stoppingsystemdservices)?- answered in SfOS forum
You can run scripts as root by using qCommand app or Sailcron (at selected time). Scripts which don’t need root are possible to run from launcher by creating *.desktop file. Scripts which don’t need root are possible to run from launcher by creating *.desktop file.
Both our scripts will need root I think
rdomschk notes
Directly from the forum:
https://forum.sailfishos.org/t/potential-bluetooth-support-in-the-android-app-support-aas/9686/206
I’m a fan of ShellEx and Sudo. So I create in ShellEx two command blocks into one command. Of course, I modified the AAS file /opt/appsupport/etc/appsupport.conf.d/10-hybris.conf beforehand. I found out, this change can even remain permanent, because we can disable/enable the BT package from AAS.
Now my way of working:
- Stop the AppSupport and open with root@tIDE editor follow file and add one line (in my case line 50 in SFOS 5.0.0.67)
/opt/appsupport/etc/appsupport.conf.d/10-hybris.conf
Proxies=android.hardware.camera.provider@2.4::ICameraProvider/legacy/0
#Add this line below line 49
Proxies=android.hardware.bluetooth@1.1::IBluetoothHci,android.hardware.bluetooth@1.0::IBluetoothHci/default-
Start the AppSupport
-
Than create follow commands in ShellEx or in Situations!
Name 1: “BT AppSupport On”
sudo systemctl stop bluetooth
sudo systemctl stop bluebinder
sudo systemctl start appsupport@defaultuser
sudo appsupport-attach pm enable com.android.bluetooth
Name 2: “BT AppSupport Off”
sudo appsupport-attach pm disable com.android.bluetooth
sudo systemctl stop appsupport@defaultuser
sudo systemctl start bluebinder
sudo systemctl start appsupport@defaultuser
sudo systemctl restart bluetooth-
Open Android settings and go to the second menu “Bluetooth” and see the BT devices
-
On X10III it needs time and I had to give the BT a name first time (e.g. Xperia10III). If the phone not found any BT devices under AAS its help to connect the phone form another phone via BT one time. On X10 it was not a problem but the X10III need this procedure.
-
With the Command “BT AppSupport Off” you can bring back your Phone to normal BT under SFOS.
Don’t be surprised. The first command block runs quite quickly, provided AAS is already running. The second block takes a while because AAS has to be stopped and started. So, the gyroscope in ShellEx is normal, and only at the end does a restart of the BT complete everything.
Only as additional information - to sudo settings:
- Install Sudo: devel-su + Password ; pkcon install sudo
- Create a file “my-personal-settings” under
/etc/sudoers.d/ - Fill the file with follow lines:
defaultuser ALL = (ALL) NOPASSWD: ALL
defaultuser ALL = NOPASSWD: /usr/bin/dbus-send
defaultuser ALL = NOPASSWD: /usr/bin/systemctl
defaultuser ALL = NOPASSWD: /usr/bin/killall
defaultuser ALL = NOPASSWD: /usr/bin/kill
In Situations you can also bring the command blocks and it’s possible to create only one Situation because you can run the commands at start and stop from this Situation. So now enough text. 
Postscript:
Hello - I had also trouble with the 2. part back to normal bluebinder service. The solution was to start AAS after start bluebinder and restart Bluetooth as last command. So you win time because the start from AAS and the bluebinder service is on if you start Bluetooth. You can also add the resart command on the end from your procedure.
With situations work this also good. I tested it for some minutes…
Government apps/services in AAS
This is a STUB with the aim being to gather which Government apps/services work or not. From the forum.